Easter Bunny Cookies

Easter Bunny Cookies are my favorite thing to bake when Easter is around the corner. Soft and buttery with a hint of vanilla and almond, these cookies are finished with pastel pink, yellow, and blue icing and rainbow sprinkles that make them look bright and festive. Adorable, delicious, and the kind of cookie everyone absolutely loves.

This post contains affiliate links. As an Amazon Affiliate, if you purchase through those links, I earn a commission. Thank you!
I make these for Easter parties, spring bake sales, and classroom treats because they’re colorful, fun, and always the first thing grabbed off any dessert table. They’re simple enough for kids to decorate but pretty enough to impress every adult too. They also make the cutest addition to an Easter basket. Store in an airtight container at room temperature for up to 3 days.
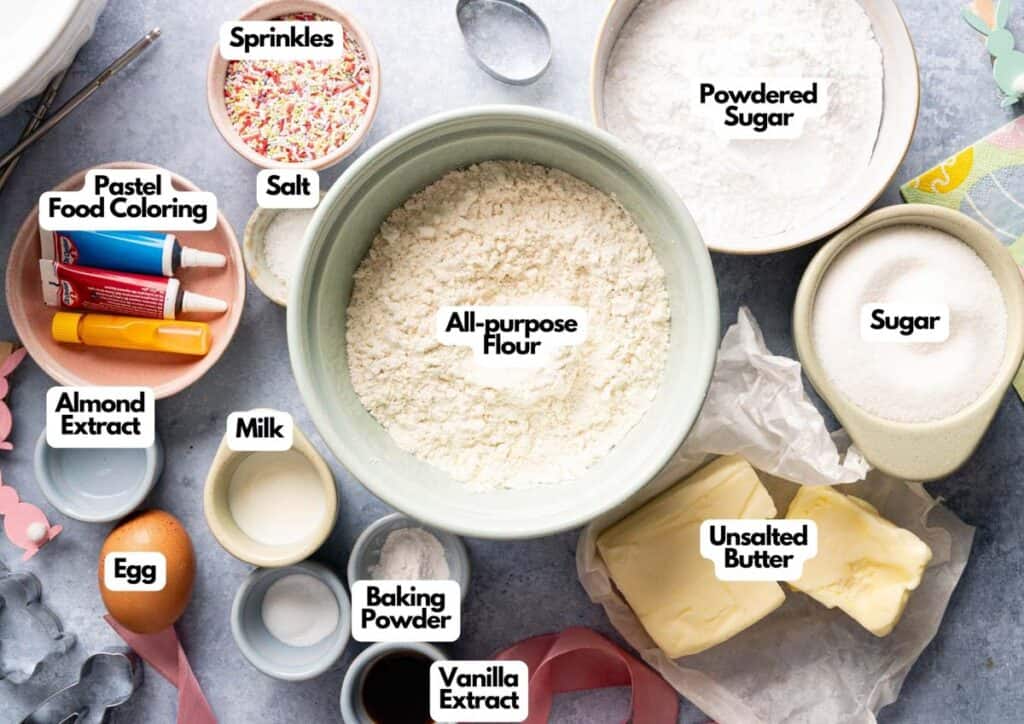
Ingredients You’ll Need
You’ll need all the ingredients shown in the photograph below.
How to Make an Easter Bunny Cookies with Step-By-Step Instructions
Scroll down for the full recipe card containing a full printable recipe and measurements in both US customary and metric units.
These cookies are as fun to make as they are to eat, so let’s get into it!
Whisk the Dry Ingredients
In a medium bowl, whisk together the all-purpose flour, baking powder, and salt, then set it aside. I always use this balloon whisk to evenly distribute everything, so my cookies bake up consistently every time.
Cream the Butter and Sugar
In a large bowl, beat the softened unsalted butter and granulated sugar until light and fluffy. This step is worth taking your time on.
I use a hand mixer to make it easy to get that pale, airy texture that gives the cookies their soft crumb. But any electric mixer, whether a stand mixer or hand mixer, would work here.
Add the Egg and Extracts
Add the egg, vanilla extract, and almond extract to the butter mixture, and mix until smooth and well combined. That almond extract is the secret touch that makes these cookies taste a little more special than a standard sugar cookie.
Mix in the Dry Ingredients
Gradually stir the dry ingredients into the wet mixture, mixing just until combined. Do not overmix here.
Overmixing develops the gluten and makes the cookies tougher, so stop as soon as the dough comes together.
Roll and Cut the Cookie Dough
Roll the dough out on a lightly floured surface to about ¼-inch thickness, then lightly press a bunny-shaped cookie cutter through the dough to cut out your little bunnies. This non-stick silicone baking mat is great for rolling dough cleanly without sticking.
Place the cut-outs on a parchment-lined baking sheet. If the dough feels too soft to work with, wrap it tightly and refrigerate for 30 minutes before rolling.
You can also use Easter egg-shaped cookie cutters to mix up the shapes on your tray.
Bake the Cookies
Preheat your oven to 350°F (180°C) before you start cutting your refrigerated cookie dough into shapes so it’s ready to go. Bake for 8 to 10 minutes, or until the edges are just light golden brown.
Let the cookies rest on the pan for 5 minutes before transferring the cookies to a wire rack to cool completely. They need to be fully cooled before icing, or the glaze will melt right off.
Make the Icing
In a bowl, whisk the powdered sugar and milk until smooth, then add milk a little at a time until you reach your desired consistency. For more vibrant pastel colors, gel food coloring works much better than liquid since it won’t thin out your icing.
Divide the icing into small bowls and tint each one with your chosen pastel shades. If you want a sharper, more defined finish, royal icing is a great alternative to this simple powdered sugar glaze.
Icing squeeze bottles or this piping bag set make it so much easier to pipe clean swirls, stripes, and polka dots onto each cookie.
Decorate the Cookies
Drizzle or pipe the icing onto the cooled cookies in fun designs. For something a little different, try a drizzle of white chocolate or melted dark chocolate, either alone or alongside the icing, for a richer finish.
You can also melt white chocolate chips for a quick and easy drizzle. Add sprinkles, colored sugar, or sanding sugar before the icing sets so everything sticks in place.
For the cutest finishing touch, add a small dot of black frosting and melted chocolate for bunny eyes. Let the cookies dry completely before serving or storing.
Serve and Enjoy
Arrange the decorated cookies on a platter or tiered stand and watch them disappear. They look stunning on an Easter dessert table, and every batch brings out the decorating instincts in everyone around.
These little bunnies travel really well to Easter gatherings, school parties, and bake sales. Once the icing is completely dry, I layer them in my portable food container with sheets of parchment or wax paper between each layer to protect the designs. Keep the container level during transport and avoid stacking too many cookies at once to keep the icing and sprinkles intact.

Equipment
Ingredients
For the Cookies:
- 2 ½ cups all-purpose flour
- 1 teaspoon baking powder
- ½ teaspoon salt
- 1 cup unsalted butter softened
- 1 cup granulated sugar
- 1 large egg
- 2 teaspoons vanilla extract
- ½ teaspoon almond extract
For the Icing:
- 1 ½ cups powdered sugar
- 2-3 tablespoons milk more as needed
- 2-3 pastel food colors pink, yellow, blue, etc.
- Sprinkles for decorating
Instructions
- In a medium bowl, whisk together the flour, baking powder, and salt. Set aside.2 ½ cups all-purpose flour, 1 teaspoon baking powder, ½ teaspoon salt
- In a large bowl, beat the softened butter and sugar until light and fluffy.1 cup unsalted butter, 1 cup granulated sugar
- Add the egg, vanilla extract, and almond extract, mixing until smooth.1 large egg, 2 teaspoons vanilla extract, ½ teaspoon almond extract
- Gradually add the dry ingredients to the wet mixture. Mix just until combined. Do not overmix.
- Roll the dough out on a lightly floured surface to about ¼-inch thickness.
- Use a bunny-shaped cookie cutter to cut out shapes and place them on a lined baking sheet.
- Bake at 350°F (180°C) for 8–10 minutes, or until the edges are lightly golden.
- Let the cookies rest on the pan for 5 minutes, then transfer to a wire rack to cool completely.
- In a bowl, mix powdered sugar and milk until smooth. Adjust the milk for your desired consistency.1 ½ cups powdered sugar, 2-3 tablespoons milk
- Divide into small bowls and tint with pastel food colors if desired.2-3 pastel food colors
- Drizzle or pipe icing onto the cooled cookies in fun designs like swirls, stripes, or polka dots. Add sprinkles before the icing sets.Sprinkles
- Let the icing dry completely before serving or storing. Enjoy!
Video
Notes
- Don’t overmix the dough: Once the dry ingredients are added, mix just until combined. Overmixing makes the cookies tough instead of soft and tender.
- Chill the dough if it’s too soft: If your dough feels sticky or hard to roll, wrap it in plastic wrap and refrigerate for 30 minutes before rolling. Cold dough holds its shape much better when cutting.
- Roll to an even ¼-inch thickness: Uneven rolling can cause some cookies to overbake while others underbake. Use rolling pin guides or rubber bands around the ends of your rolling pin to keep the thickness consistent.
- Pull them out when the edges are just golden: The cookies will look slightly underdone in the center when you take them out, but they’ll firm up as they cool on the pan. Waiting for the centers to look done means they’ll be overbaked.
- Add sprinkles before the icing sets: Once you pipe or drizzle the icing, add your sprinkles right away. If you wait too long, the icing will dry, and the sprinkles won’t stick.
- Flash-freeze before storing: If you want to freeze the decorated cookies, place them in a single layer on a baking sheet and freeze for 1 hour before transferring to a container. The icing will be fully set, and the designs won’t smudge.
Nutrition
How to Store Leftovers
Once the icing is fully set, store the cookies in an airtight container at room temperature for up to 3 days. Place a sheet of parchment paper, plastic wrap, or wax paper between layers to keep the icing from sticking together.
For longer storage, freeze the unfrosted cookies in a freezer-safe container for up to 2 months, then thaw at room temperature and decorate fresh when you’re ready to serve. A freezer-safe glass container stacks neatly in the freezer and keeps the cookies protected without absorbing any odors.
If you’ve already frosted them, you can still freeze the frosted cookies layered with parchment or wax paper; just allow extra time for them to thaw completely at room temperature before serving.
What to Serve With Easter Bunny Cookies
They’re right at home on a spring dessert spread alongside other pastel treats like lemon bars, coconut cake, and carrot cake cookies. They pair really well with a light fruit salad or a bowl of fresh berries if you want something that balances out the sweetness.
For drinks, a cold glass of lemonade, a fruity sparkling punch, or even a warm cup of chamomile tea goes perfectly with these soft, buttery cookies. They’re sweet but not overwhelming, so they work well alongside both light beverages and richer dessert options.
More Easy Recipes for You to Try at Home
If you love these cookies, here are more Easter treats and spring desserts perfect for your celebrations.
- Lemon Brownies
- Glazed Lemon Pound Cake
- Hot Cross Buns
- Chocolate Covered Oreo Easter Nests
- Strawberry Cupcakes
About the Author

Hey there! I’m Mandy
Mandy Applegate is a home cook, food blogger, and writer who believes the best meals are the ones shared with the people you love.
She’s all about easy recipes that taste amazing, the kind that make ordinary days feel a little more special and remind you why cooking at home matters.
She has been published on NBC, the Daily News, the Boston Herald, and the Chicago Sun-Times, amongst many others.


