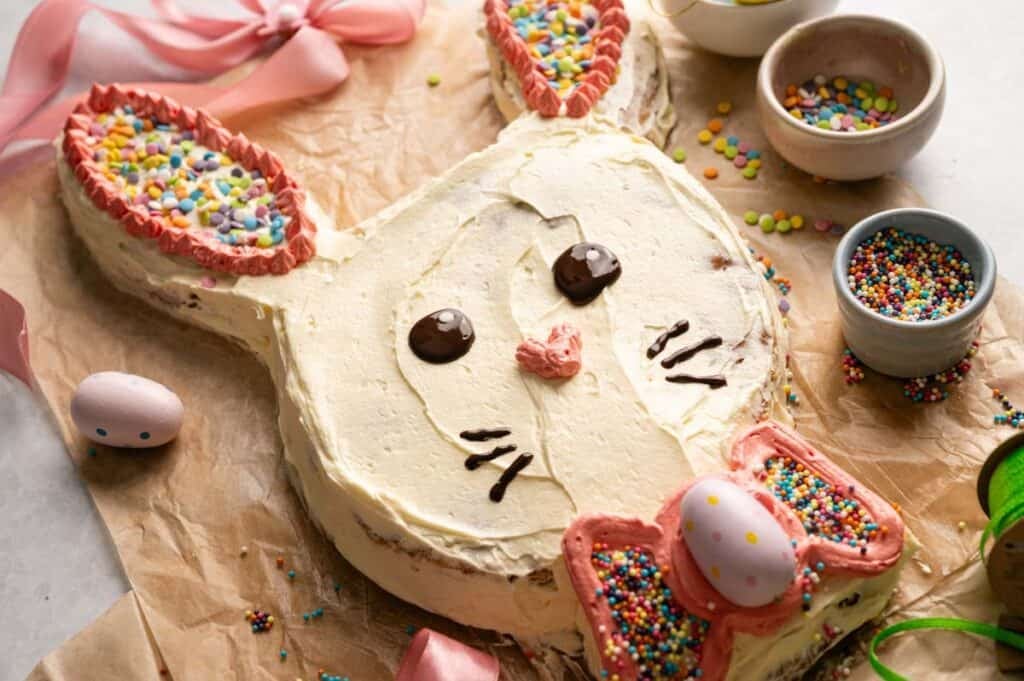
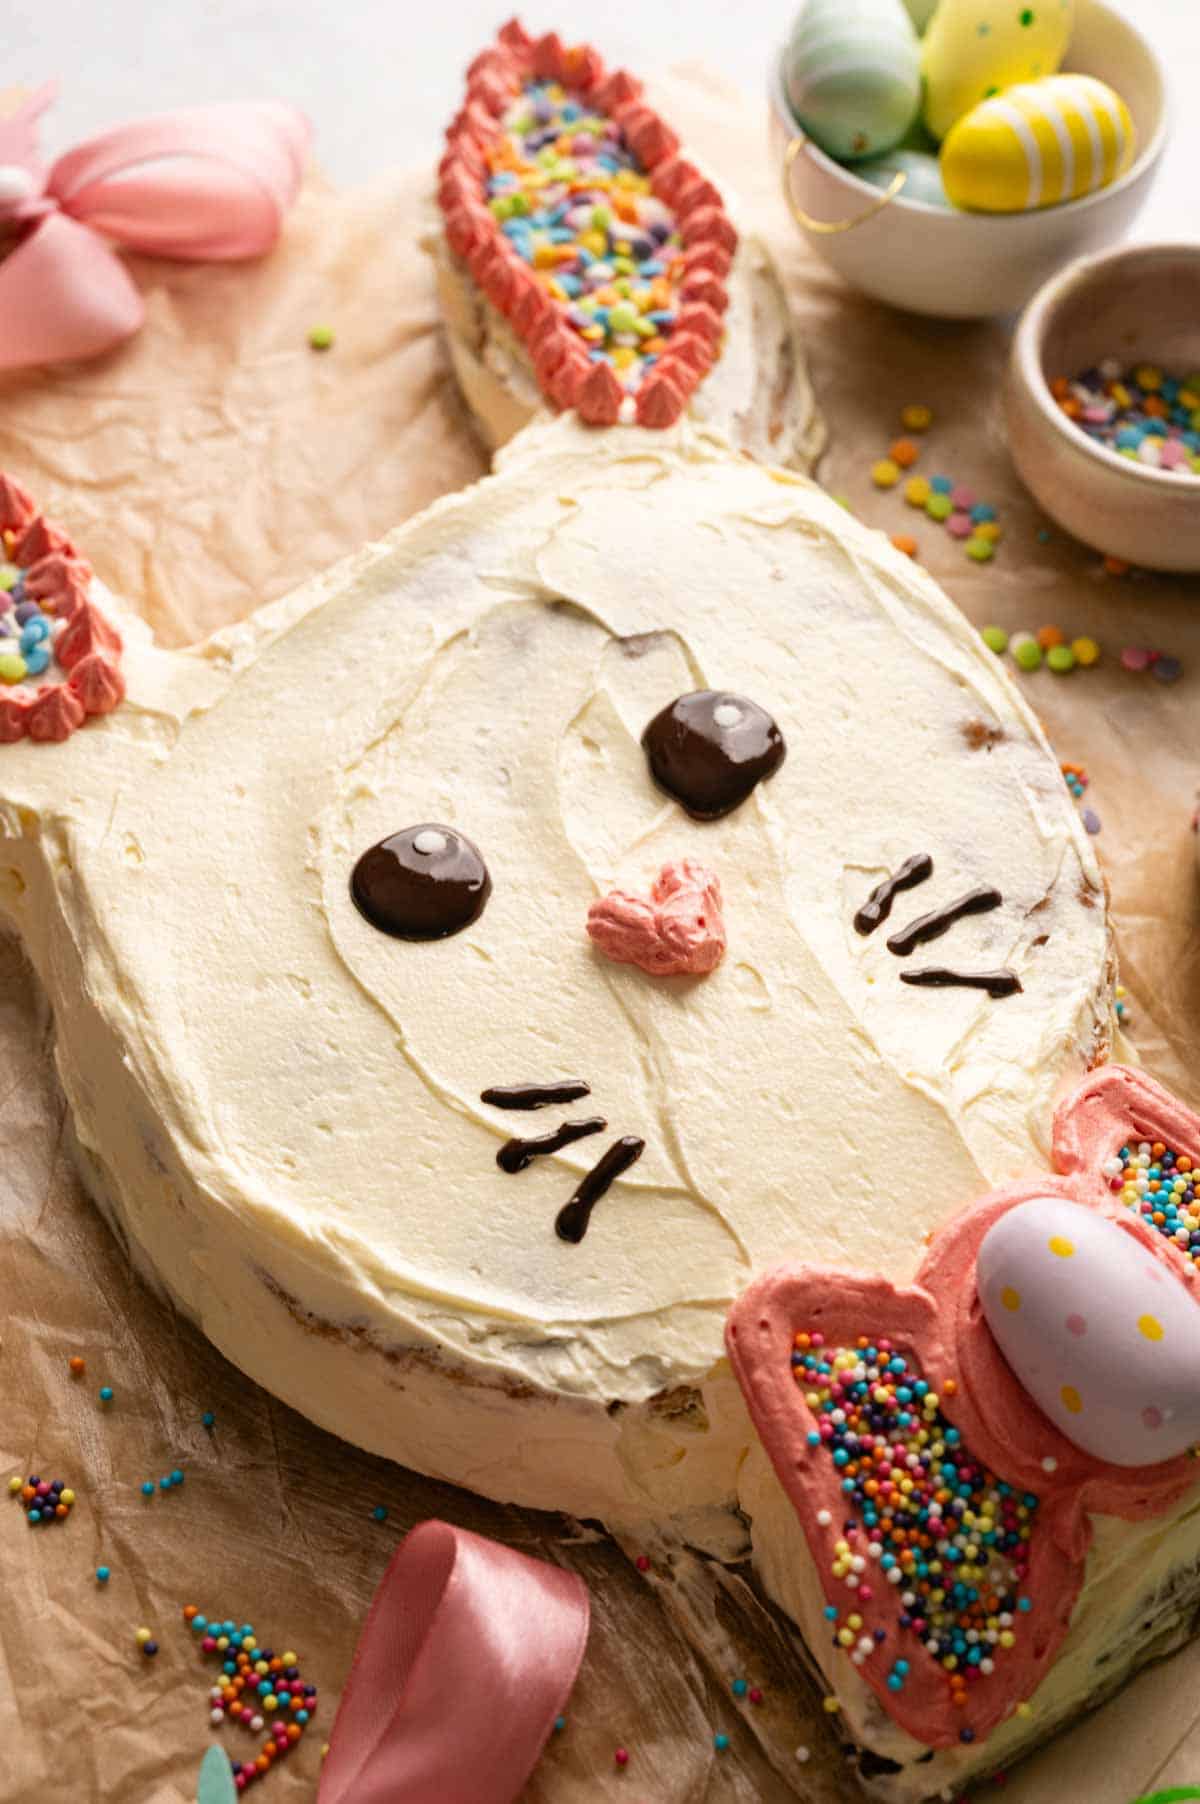
Easter Bunny Cake

I always look forward to making this Easter Bunny Cake because it brings out everyone’s inner kid. It’s soft, fluffy, and covered in the creamiest buttercream, with an adorable bunny face drawn in melted chocolate and a colorful sprinkle-covered bow tie that makes every single guest smile the moment they see it.
This post contains affiliate links. As an Amazon Affiliate, if you purchase through those links, I earn a commission. Thank you!
I make this every Easter and for spring birthday parties because it has honestly become the most anticipated dessert in my house. I wouldn’t have it any other way. It’s beginner-friendly, incredibly fun to decorate, and always the centerpiece that makes every festive table feel extra special. Store covered at room temperature or in the fridge for up to 3 days.
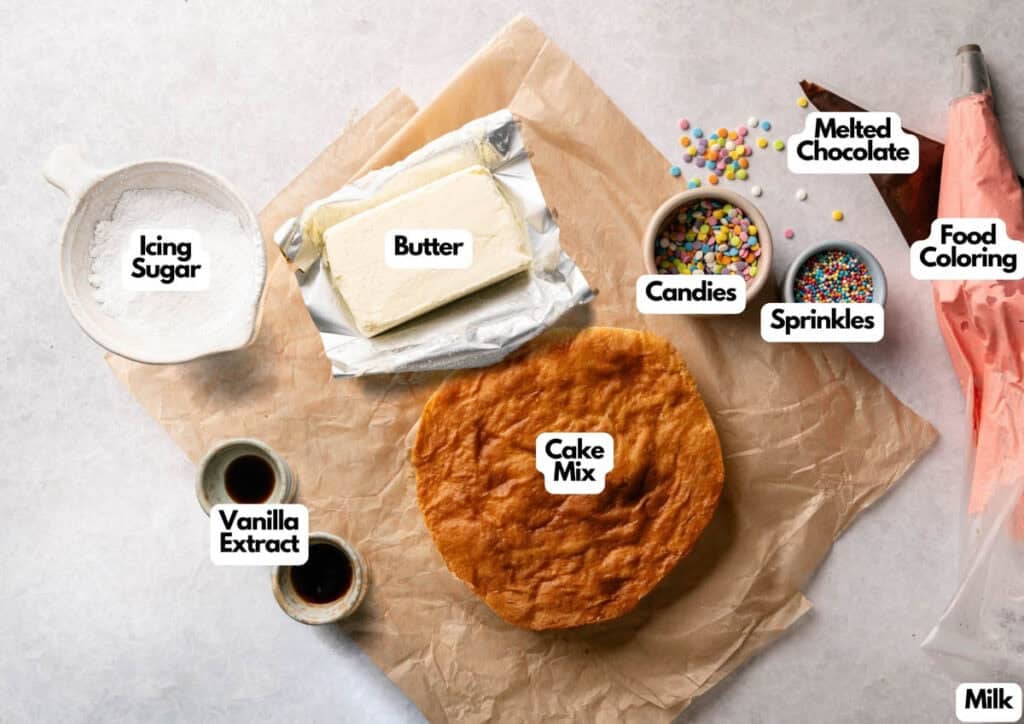
Ingredients You’ll Need
You’ll need all the ingredients shown in the photograph below.
How to Make Easter Bunny Cake with Step-By-Step Instructions
Scroll down for the full recipe card containing a full printable recipe and measurements in both US customary and metric units.
Here’s how to put together the most fun Easter centerpiece you’ll enjoy making every Easter season!
Bake and Cool the Cakes
Prepare the cake mixes according to the package directions and bake the batter in round cake pans. To make cleanup a real piece of cake, I use nonstick pans.
My springform cake pan has a nonstick surface that prevents sticking and releases the cake without fuss. You can also line the pans with parchment paper. If you’re using dark or nonstick pans, though, they tend to absorb more heat, so keep a close watch on them.
As for the cake base, you can use any cake flavor you want. You can have vanilla, mocha, strawberry, or chocolate cake, or if you want it really big on Easter, try carrot cake.
Once baked, cool cakes completely because frosting a warm cake will cause the buttercream to slide right off. You can let them cool slightly in the pan for a few minutes, then transfer them to a cooling rack to cool completely.
Prepare the Buttercream Frosting
In a large bowl, beat the softened butter with a hand mixer or stand mixer with a paddle attachment until smooth and creamy.
Gradually add the powdered sugar and vanilla extract, mixing on low speed at first so you don’t end up with a powdered sugar cloud. Once everything is combined, beat in the milk, ideally over medium-high speed, until the frosting is light and fluffy.
Divide the fluffy white frosting into separate bowls based on how many colors you want. Keep the majority white for the face, and tint a portion pink for details like the ears, nose, and bow tie.
SERIOUSLY GOOD
DESSERTS!
Dessert First is a collection of 61 RECIPES to show you that you can make beautiful, impressive desserts right in your own kitchen, no matter your skill level.
Immediate eBook download. No physical book available.
Includes ad-free recipes like:
∙ Lemon Pound Cake
∙ Starbucks Cake Pops
∙ Boston Cream Pie
∙ Chocolate Mousse
∙ Matcha Tiramisu
...and much more!

Shape and Frost the Bunny Head
Place one whole round cake on a large platter or serving tray. Then, from the second cake, cut out two long oval shapes of the same size for the ears and a small bow-tie shape from the remaining piece with a serrated knife.
Position the bunny ears above the face cake and the bow tie just below it. Spread a thin layer of white frosting over the bunny’s face and ears, smoothing it out evenly with an offset spatula.
Use the pink frosting for the ears and the bow tie. Take your time here since a smooth, even layer of frosting makes the finished bunny cake look much more polished.
Add the Face Details
Use melted chocolate or chocolate icing to draw the eyes and whiskers. You can use a piping bag fitted with a small tip for clean, precise lines, but chocolate chips or candy melts work beautifully, too, if you’d rather skip the piping.
For the nose, add a small amount of the remaining pink frosting to the center of the face. I like using a piping bag set that has everything I need for cake decorating, so I can design and style my cakes with ease.
If you’d like to add some texture to the face, gently pressing flaked coconut into the white frosting creates a fluffy look that mimics the bunny’s fur beautifully and adds a subtle sweetness to every bite. Now, that’s completely optional.
Decorate the Bow Tie
Finish by pressing jelly beans or colorful candies into the frosted bow tie for a bright, festive look. Scatter sprinkles over the face and ears if you want for extra color and fun.
You may even go extra by fully coating some sweetened shredded coconut with green food coloring and spreading it around the bunny base to create a grass effect. You can be as creative as you can be with the decorations and add other candies if desired.
Slice and Serve
Now that your Easter bunny cake comes to life, it’s ready for slicing. Cut into squares, then finally, serve and enjoy!
Because the Easter Bunny Cake is such a popular centerpiece and the usual star of the table for Easter brunch and spring parties, it usually ends up leaving the house to share with your neighbors, relatives, or faraway friends.
So, to transport it safely, I place the platter or tray inside a large sheet cake carrier with a raised lid and handles that can accommodate the height of the ears. Keep the cake level at all times during the drive and avoid stacking anything on top of it.
If the weather is warm, transport the cake in an air-conditioned car rather than a hot trunk to keep the buttercream from getting too soft. Pop it in the refrigerator when you arrive to firm it back up before serving.
Equipment
Ingredients
Cake:
- 2 boxes cake mix prepared according to package directions (baked in round pans)
Buttercream Frosting:
- ¾ cup butter softened
- 2½ cups powdered sugar
- 1 teaspoon vanilla extract
- 3 tablespoons milk
- Food coloring pale yellow, pink, or desired colors
Decorations:
- Sprinkles
- Melted chocolate
- Jellybeans or colorful candies
- Chocolate chips or candy melts optional
Instructions
- Prepare both cake mixes according to the package instructions and bake in round cake pans. Allow the cakes to cool completely before decorating.2 boxes cake mix
- In a large bowl, beat the softened butter until smooth and creamy. Gradually add the powdered sugar and vanilla extract, mixing on low at first to avoid a sugar cloud. Once combined, beat in the milk until the frosting is light and fluffy.¾ cup butter, 2½ cups powdered sugar, 1 teaspoon vanilla extract, 3 tablespoons milk
- Divide the frosting if needed and add food coloring to create your desired shades (white for the face, pink for details, etc.).Food coloring
- Place one whole round cake on a large serving platter — this will be the bunny’s face.
- From the second cake, cut out two long oval shapes for the ears and a small bow-tie shape. Arrange the ears above the face and the bow tie just below it.
- Spread white frosting over the bunny’s face and ears, smoothing it out evenly. Use pink frosting to fill in the inner ear sections and to frost the bow tie.
- Use melted chocolate or chocolate icing to draw the eyes and whiskers. You can also use chocolate chips or candy melts for the eyes if preferred. Pipe a small pink nose in the center of the face.Melted chocolate, Chocolate chips or candy melts
- Finish by decorating the bow tie with jellybeans or colorful candies for a bright, festive touch. Add sprinkles if desired for extra fun.Jellybeans or colorful candies, Sprinkles
Video
Notes
Nutrition
SERIOUSLY GOOD
DESSERTS!
Dessert First is a collection of 61 RECIPES to show you that you can make beautiful, impressive desserts right in your own kitchen, no matter your skill level.
Immediate eBook download. No physical book available.
Includes ad-free recipes like:
∙ Lemon Pound Cake
∙ Starbucks Cake Pops
∙ Boston Cream Pie
∙ Chocolate Mousse
∙ Matcha Tiramisu
...and much more!
How to Store Leftovers
Carefully transfer the bunny cake to a large airtight container and store covered at room temperature for up to 3 days, or in the fridge if your kitchen runs warm.
The buttercream firms up in the fridge, so let the cake sit on your counter for about 20 to 30 minutes before serving if you prefer it soft.
You can also freeze individual slices by wrapping each one tightly in plastic wrap and placing them in a freezer-safe container for up to 2 months. Thaw slices in the refrigerator overnight or on the counter for about an hour before serving.
What to Serve With Easter Bunny Cake
It’s a treat that pairs beautifully with classic Easter dinner or brunch. The light, sweet buttercream flavor complements savory dishes like glazed ham, deviled eggs, or a spring vegetable quiche really well.
It also works alongside a simple fruit salad loaded with strawberries and kiwi. For drinks, a cold glass of lemonade, a fruity punch bowl, or even sparkling water with fresh citrus slices all complement the sweetness without competing with it.
A pitcher of strawberry lemonade covers everyone at the table and pairs nicely with the light, sweet flavors.
More Easy Recipes for You to Try at Home
I bet you’ll also love these other delicious recipes you’ll find yourself making again and again.
- Easter Bunny Cookies
- Chocolate Covered Oreo Easter Nests
- Carrot Cake Cookies
- Hot Cross Buns
- Watergate Salad
About the Author

Hey there! I’m Mandy
Mandy Applegate is a home cook, food blogger, and writer who believes the best meals are the ones shared with the people you love.
She’s all about easy recipes that taste amazing, the kind that make ordinary days feel a little more special and remind you why cooking at home matters.
She has been published on NBC, the Daily News, the Boston Herald, and the Chicago Sun-Times, amongst many others.