Decadent Biscoff Brownies
If you’re a fan of rich, fudgy brownies and the irresistible flavor of Biscoff, then this recipe is right up your alley. These Biscoff Brownies combine the best of both worlds, blending the deep chocolatey goodness of a classic brownie with the warm, spiced notes of Biscoff butter. The result is a treat that’s not only indulgent but also incredibly easy to make. Whether you’re new to baking or a seasoned pro, these brownies are a surefire way to bring some serious flavor to your dessert game.
This post contains affiliate links. As an Amazon Affiliate, if you purchase through those links, I earn a small commission. Thank you!
I could tell you that I love to eat these awesomely gooey Biscoff Brownies at Thanksgiving and Christmas, that I’ll take them along to Potlucks or have them as a sweet treat for game day; but if I’m telling the truth, I love to have these brownies on a regular basis because I just can’t get enough of them and nor can my family.
They are so easy to make in just 45 minutes, and if you’re feeling generous, you can place them in a gift box and gift someone special a homemade treat!
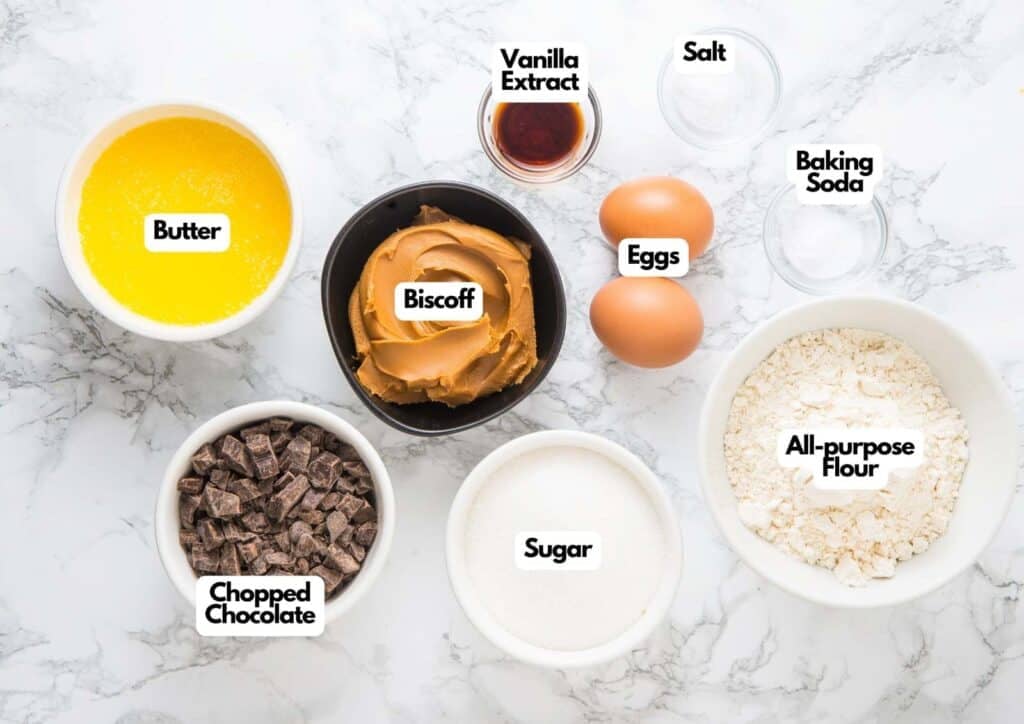
Ingredients You’ll Need
You’ll need all the ingredients shown in the photograph below.
How to Make Biscoff Brownies with Step-By-Step Instructions
Scroll down for the full recipe card containing a full printable recipe and measurements in both US customary and metric units.
This really is a simple recipe, even the kids can help you make them – just follow my simple instructions.
Get Your Pan Ready
Start by preheating your oven to 350°F (175°C). While it’s heating up, grab a 9×9 inch square baking pan and line it with parchment paper. Leave a bit of overhang on the edges so you can easily lift out the brownies once they’re done.
Melt the Chocolate and Butter
In a microwave-safe bowl, combine the chopped chocolate with the melted butter. Heat it up in short bursts of 20-30 seconds, stirring each time until everything is smooth and velvety. This ensures you won’t burn the chocolate, keeping it silky and perfect for your brownies.


Stir in the Wet Ingredients
To that lovely chocolate mixture, add the sugar, eggs, and vanilla extract. Give it a good stir until the ingredients are fully mixed and the batter looks glossy and smooth. This step is key to getting that rich, fudgy texture we all love in brownies.


SERIOUSLY GOOD
DESSERTS!
Dessert First is a collection of 61 RECIPES to show you that you can make beautiful, impressive desserts right in your own kitchen, no matter your skill level.
Immediate eBook download. No physical book available.
Includes ad-free recipes like:
∙ Lemon Pound Cake
∙ Starbucks Cake Pops
∙ Boston Cream Pie
∙ Chocolate Mousse
∙ Matcha Tiramisu
...and much more!

Mix in the Dry Ingredients
Next, sift the flour, baking soda, and salt directly into the bowl. Stir just until the dry ingredients are fully incorporated. You don’t want to overmix, or you’ll lose that tender brownie crumb.


Swirl in the Biscoff Butter
Pour the brownie batter into your prepared pan, spreading it out evenly with a spatula. Now for the fun part—drop spoonfuls of Biscoff butter over the top of the batter. Using a toothpick or the tip of a knife, swirl the Biscoff butter into the batter to create a beautiful marbled effect. Don’t overdo it; a few gentle swirls will give you that perfect blend of brownie and Biscoff in every bite.


Bake and Test for Doneness
Pop the pan into your preheated oven and bake for about 30 minutes. You’ll know the brownies are ready when a toothpick inserted into the center comes out with a few moist crumbs. The key is to avoid overbaking—remember, you want these brownies fudgy, not cakey.

Cool and Serve
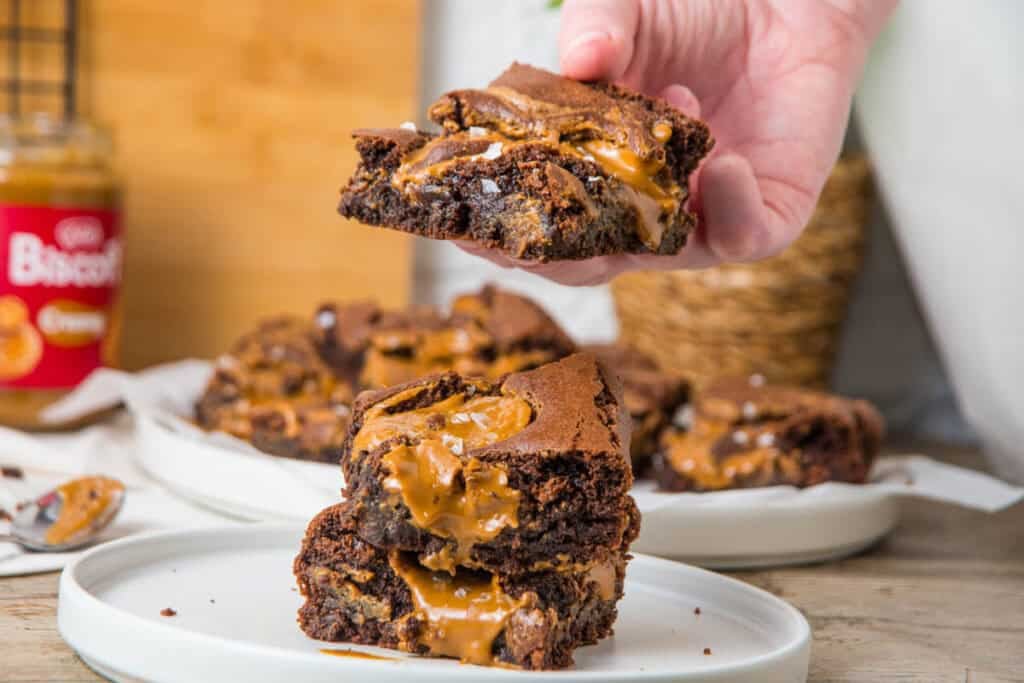
Let the brownies cool completely in the pan before lifting them out using the parchment paper. Once they’re cool, slice them into squares. For an extra touch, sprinkle a bit of flaky sea salt on top before serving. It adds a wonderful contrast to the sweetness and brings out all those delicious flavors.

Recipe Notes and Expert Tips
- Quality of Chocolate: For the best flavor and texture, opt for high-quality chocolate with a cocoa content of at least 60%. This will give your brownies a richer taste and a smoother finish.
- Chocolate Melting: Take your time when melting the chocolate and butter together. Short bursts of heat and regular stirring help prevent burning and ensure a smooth, even consistency.
- Biscoff Butter Temperature: Make sure your Biscoff butter is at room temperature before using it. This makes it easier to spoon and swirl into the batter, creating that beautiful marbled effect.
- Biscoff Swirling: Less is more when it comes to swirling the Biscoff butter into the batter. A few swirls create a marbled look and ensure every bite has that perfect mix of flavors.
- Baking Time: Keep a close eye on your brownies towards the end of the baking time. You want them to be set but still slightly gooey in the center. If you wait for a clean toothpick, they’ll be overdone.
- Cooling: Patience is key—let the brownies cool completely in the pan before cutting them. This allows them to set properly and ensures you get that perfect, fudgy texture.

How to Store Leftover Biscoff Brownies
To keep your Biscoff brownies fresh, store them in an airtight container at room temperature. They’ll stay delicious for up to four days. If you prefer to keep them for longer, you can refrigerate them for up to a week.
These brownies also freeze well. Wrap each one individually in plastic wrap, then place them in a freezer-safe container or bag. They’ll last in the freezer for up to 3 months. When you’re ready to enjoy them, just let them thaw at room temperature.
What to Serve With Biscoff Brownies
These brownies are perfect on their own, but if you’re feeling a bit extra, try serving them with a scoop of vanilla ice cream or a dollop of whipped cream. A drizzle of caramel sauce or a sprinkle of crushed Biscoff cookies can take them to the next level. And of course, they pair beautifully with a hot cup of coffee or a cold glass of milk.

More Easy Dessert Recipes for You to Try at Home
Got a sweet tooth? You should try these drool-worthy recipes!
- Slutty Brownies
- Cinnamon Sugar Blondies
- Cake Mix Chocolate Chip Cookie Bars
- Chocolate Pumpkin Bars
- Pumpkin Pie Cheesecake

Ingredients
- 1 cup Biscoff butter
- ½ cup melted butter
- 1 cup granulated sugar
- 2 eggs
- 1 ¼ cups all-purpose flour
- ½ teaspoon baking soda
- 1 teaspoon vanilla extract
- ½ teaspoon salt
- 1 cup chopped chocolate
Instructions
- Preheat the oven to 350°F (175°C).
- Line a 9×9 inch (23×23 cm) square baking pan with parchment paper, making sure the paper hangs over the edges for easy removal.
- In a microwave-safe bowl, combine the chopped chocolate with the melted butter. Heat in 20-30 second intervals, stirring between each, until the chocolate is completely melted and the mixture is smooth.1 cup chopped chocolate, ½ cup melted butter
- Add the sugar, eggs, and vanilla extract to the chocolate and butter mixture. Stir well until all ingredients are fully combined and the mixture is smooth.1 cup granulated sugar, 2 eggs, 1 teaspoon vanilla extract
- In the same bowl, sift in the flour, baking soda, and salt. Mix until all the ingredients are well incorporated and the batter is smooth.1 ¼ cups all-purpose flour, ½ teaspoon baking soda, ½ teaspoon salt
- Pour the batter into the prepared pan and spread it evenly with a spatula. Drop spoonfuls of Biscoff butter over the brownie batter. Use a toothpick or the tip of a knife to swirl the Biscoff butter throughout the batter, creating a marbled effect.1 cup Biscoff butter
- Bake in the preheated oven for about 30 minutes, or until a toothpick inserted into the center comes out with moist crumbs but not raw batter.
- Let the brownies cool completely in the pan before cutting into squares.
- Top the brownies with a sprinkle of flaky sea salt or Maldon salt before serving.
Notes
- Quality of Chocolate: For the best flavor and texture, opt for high-quality chocolate with a cocoa content of at least 60%. This will give your brownies a richer taste and a smoother finish.
- Chocolate Melting: Take your time when melting the chocolate and butter together. Short bursts of heat and regular stirring help prevent burning and ensure a smooth, even consistency.
- Biscoff Butter Temperature: Make sure your Biscoff butter is at room temperature before using it. This makes it easier to spoon and swirl into the batter, creating that beautiful marbled effect.
- Biscoff Swirling: Less is more when it comes to swirling the Biscoff butter into the batter. A few swirls create a marbled look and ensure every bite has that perfect mix of flavors.
- Baking Time: Keep a close eye on your brownies towards the end of the baking time. You want them to be set but still slightly gooey in the center. If you wait for a clean toothpick, they’ll be overdone.
- Cooling: Patience is key—let the brownies cool completely in the pan before cutting them. This allows them to set properly and ensures you get that perfect, fudgy texture.
Nutrition
SERIOUSLY GOOD
DESSERTS!
Dessert First is a collection of 61 RECIPES to show you that you can make beautiful, impressive desserts right in your own kitchen, no matter your skill level.
Immediate eBook download. No physical book available.
Includes ad-free recipes like:
∙ Lemon Pound Cake
∙ Starbucks Cake Pops
∙ Boston Cream Pie
∙ Chocolate Mousse
∙ Matcha Tiramisu
...and much more!
About the Author

Hey there! I’m Mandy
Mandy Applegate is a home cook, food blogger, and writer who believes the best meals are the ones shared with the people you love.
She’s all about easy recipes that taste amazing, the kind that make ordinary days feel a little more special and remind you why cooking at home matters.
She has been published on NBC, the Daily News, the Boston Herald, and the Chicago Sun-Times, amongst many others.


