Neapolitan Ice Cream
Neapolitan Ice Cream is a classic for a reason—you get three favorite flavors in every slice without having to pick just one. With just a few bowls, simple ingredients, and a little chilling time, you can whip up a dessert that’s creamy, colorful, and packed with creamy vanilla, rich chocolate, and sweet strawberry in every bite. You don’t even need any churning or an ice cream maker to make it at home, which makes everything so much better.
This post contains affiliate links. As an Amazon Affiliate, if you purchase through those links, I earn a commission. Thank you!
I love making this Neapolitan ice cream during the summer when the days are long and everyone’s looking for something cold and fun to enjoy, adults love it and the kids go crazy for it With layers of strawberry ice cream, vanilla ice cream, and chocolate ice cream, it’s easy to make ahead, freezes beautifully, and is always ready to pull out for dinners, backyard cookouts, or laid-back afternoons.
Ingredients You’ll Need
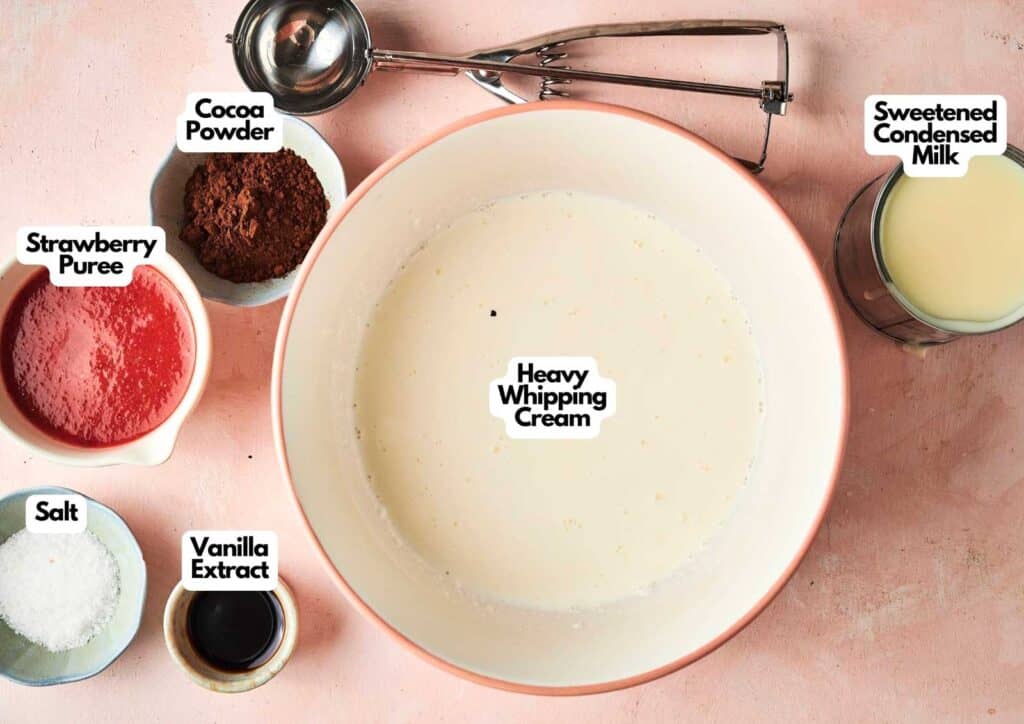
You’ll need all the ingredients shown in the photograph below.
How to Make Neapolitan Ice Cream with Step-By-Step Instructions
Scroll down for the full recipe card containing a full printable recipe and measurements in both US customary and metric units.
If you follow all my simple steps, you’ll see just how easy it is to make rich, colorful Neapolitan ice cream and the perfect blend of flavors at home.
Whip the Heavy Cream
Whip your heavy cream using a hand mixer in a large bowl until stiff peaks form. I use this electric hand mixer. I’ve had it for a while, and it’s super easy to use. You’ll know it’s ready to go when the cream holds its shape and doesn’t slide off your spoon.


Fold in the Sweetened Condensed Milk Mixture
Gently fold the sweetened condensed milk, vanilla extract, and salt into the whipped cream, I use a silicone spatula for this. Take your time folding so you keep all that fluffy texture that makes the ice cream light and creamy.

SERIOUSLY GOOD
DESSERTS!
Dessert First is a collection of 61 RECIPES to show you that you can make beautiful, impressive desserts right in your own kitchen, no matter your skill level.
Immediate eBook download. No physical book available.
Includes ad-free recipes like:
∙ Lemon Pound Cake
∙ Starbucks Cake Pops
∙ Boston Cream Pie
∙ Chocolate Mousse
∙ Matcha Tiramisu
...and much more!

Divide the Base and Flavor Each Layer
Split the whipped mixture evenly into three bowls. Keep one bowl plain for the vanilla layer, stir the cocoa powder into the second for the chocolate layer, and mix the strawberry purée into the third.
If you want that bright, playful pink color, a few drops of red food coloring will do the trick.


Assemble the Layers
Next, get your loaf pan. This is the one I use; it’s cost-effective, and I’ve had it forever.
Line your loaf pan with parchment paper, trust me, these liners save you a whole lot of panic when it’s time to remove the ice cream! Leaving a bit of overhang on the sides to make lifting the ice cream out easier later. Use strips of cake cardboard or extra pieces of parchment to create dividers inside the pan.
Carefully spoon each flavor into its own section, filling the pan side-by-side so the layers stay neat and distinct. This way, you’ll get those signature Neapolitan stripes when you slice into it later.


Freeze Until Firm
Cover the pan tightly with plastic wrap, pressing it directly against the surface of the ice cream if you can, to prevent ice crystals from forming and to keep the texture creamy and smooth.
Freeze for at least 5 hours—or overnight—to give it plenty of time to set up properly.
Remove the Dividers
Once the ice cream is fully frozen, remove the plastic wrap and place a flat, solid surface like a small baking sheet or cutting board on top of the loaf pan, leaving the parchment paper overhang outside.
Flip the whole pan upside down so the ice cream releases onto the flat surface, with the parchment paper still attached.
Gently peel away the parchment, then carefully remove any cardboard dividers from the bottom. Flipping the ice cream out like this helps prevent the layers from splitting or breaking apart.


Seal the Layers
Use a flat tool, like the back of a spoon or a spatula, to gently press the three sections together so they seal into one solid block. Press just firmly enough to connect the layers, but not so hard that you mash them or cause the ice cream to start melting.
Working quickly (but still carefully) helps keep everything cold and the layers neat and clean for slicing or scooping later.
Return to the Pan
With the ice cream still upside down and resting on the flat sheet, place the empty loaf pan upside down over the block so it lines up. Hold both the pan and the sheet firmly together, then flip the whole thing in one smooth motion so the loaf pan is right-side up again with the ice cream block inside.
Remove the flat sheet from the top and smooth out the surface if needed.

Freeze Again and Serve
You can enjoy a scoop right away, and I love this heavy scoop that I’ve had for months now. It’s great that you can just toss it in the dishwasher once you’re done scooping.
If it’s started melting too soon, put it back in the freezer for about 30 minutes after sealing the layers to firm it back up. When you’re ready to serve, use a sturdy ice cream scoop to slice or scoop neat portions.
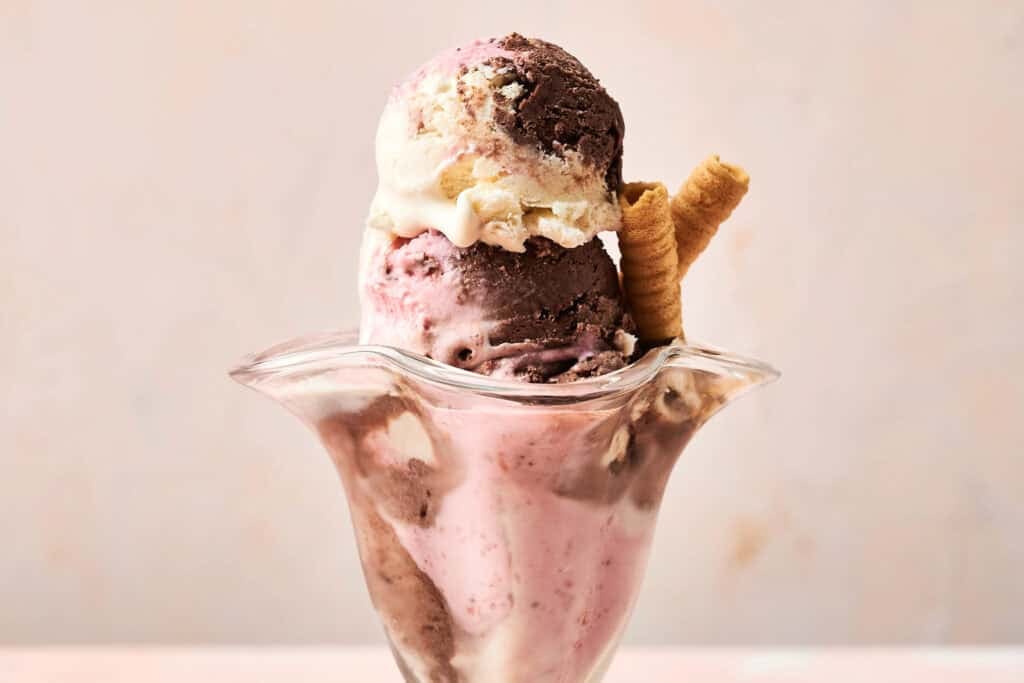
For a fun and classic touch, serve the Neapolitan ice cream in sundae glasses. I find that these are perfect for adults and kids alike, and they’re good sturdy but pretty glasses.
Add a few wafer rolls on the side for a little extra crunch and flair. Lastly, enjoy the little trio of flavors in every colorful, creamy bite!

Recipe Notes and Expert Tips
I’ve learned a few tricks that make homemade Neapolitan Ice Cream turn out great every time, so here’s what you should know:
- Cold Cream Whips Best: Chill your heavy cream before you whip it. Cold cream whips faster and gives you a sturdier, fluffier base.
- Be Gentle When Folding: Carefully fold in the sweetened condensed milk to avoid losing the air you whipped into the cream.
- Use Good Cocoa Powder: A high-quality unsweetened cocoa powder makes the chocolate flavor deeper and more satisfying.
- Fresh Strawberry Puree Tastes Brighter: Blend fresh strawberries instead of using jarred sauce. It gives the strawberry layer a fresher, more natural flavor.
- Dividers Make Cleaner Layers: Using strips of parchment or cardboard keeps the flavors neatly separated while freezing, so your ice cream looks as good as it tastes.
- Wrap It Well Before Freezing: Cover the surface with plastic wrap to prevent ice crystals from forming and keep the texture creamy.
- Freeze Overnight for Best Results: Giving it a full overnight freeze makes sure the layers are solid enough to slice cleanly without blending together.
- Flip for Cleaner Layers: To make removing the dividers easier and protect the layers from breaking, place a flat surface over the pan, flip the ice cream out, and peel off the parchment before gently removing the dividers.

How to Store Leftovers
Leftovers are very unlikely (trust me), but if you have any, transfer them to a freezer-safe airtight container. These are the containers I love; they are stackable and easy to clean. Just
press a layer of plastic wrap directly onto its surface before covering it tightly with the lid. This will help prevent freezer burn and ice crystals from forming.
This Neapolitan ice cream keeps well for up to 2 months in the freezer. Once you’re ready to dig in, let it sit out for a few minutes before scooping to make serving easier.
What to Serve With Neapolitan Ice Cream
Neapolitan Ice Cream goes with just about everything. Scoop it onto a slice of pound cake, sandwich it between cookies for homemade Neapolitan ice cream sandwiches, or serve it alongside a batch of brownies.
You can also top it with hot fudge or fresh berries if you want to dress it up a little more. For a fun twist, layer it into a sundae glass with crushed cookies, sprinkles, and a cherry on top for an easy, crowd-pleasing dessert.

More Easy Recipes for You to Try at Home
I have plenty more simple and delicious treats you can make without a lot of fuss.

Ingredients
- 14 ounces sweetened condensed milk
- 2 teaspoons vanilla extract
- ¼ teaspoon salt
- 2 cups heavy whipping cream
- 2 tablespoons cocoa powder
- ½ cup strawberry puree
- Red food coloring if desired
- Wafer rolls optional
Instructions
- In a large bowl, use a hand mixer to whip the heavy cream until stiff peaks form.2 cups heavy whipping cream
- Gently fold in the sweetened condensed milk, vanilla extract, and salt until well combined. Set aside.14 ounces sweetened condensed milk, 2 teaspoons vanilla extract, ¼ teaspoon salt
- Split the mixture evenly into three separate bowls. Leave one bowl plain for the vanilla layer. Mix the cocoa powder into the second bowl for the chocolate layer.2 tablespoons cocoa powder
- Stir the strawberry purée into the third bowl, adding a few drops of red food coloring if you want a brighter pink hue.½ cup strawberry puree, Red food coloring
- Using cake cardboard or strips of parchment paper as dividers, layer the chocolate, vanilla, and strawberry mixtures side by side in a loaf pan.
- Cover tightly with plastic wrap and freeze for at least 5 hours, or overnight, until firm.
- Once frozen solid, remove the dividers. Gently press the three sections together with a flat surface to seal the layers.
Notes
- Cold Cream Whips Best: Chill your heavy cream before you whip it. Cold cream whips faster and gives you a sturdier, fluffier base.
- Be Gentle When Folding: Carefully fold in the sweetened condensed milk to avoid losing the air you whipped into the cream.
- Use Good Cocoa Powder: A high-quality unsweetened cocoa powder makes the chocolate flavor deeper and more satisfying.
- Fresh Strawberry Puree Tastes Brighter: Blend fresh strawberries instead of using jarred sauce. It gives the strawberry layer a fresher, more natural flavor.
- Dividers Make Cleaner Layers: Using strips of parchment or cardboard keeps the flavors neatly separated while freezing, so your ice cream looks as good as it tastes.
- Wrap It Well Before Freezing: Cover the surface with plastic wrap to prevent ice crystals from forming and keep the texture creamy.
- Freeze Overnight for Best Results: Giving it a full overnight freeze makes sure the layers are solid enough to slice cleanly without blending together.
- Flip for Cleaner Layers: To make removing the dividers easier and protect the layers from breaking, place a flat surface over the pan, flip the ice cream out, and peel off the parchment before gently removing the dividers.
Nutrition
SERIOUSLY GOOD
DESSERTS!
Dessert First is a collection of 61 RECIPES to show you that you can make beautiful, impressive desserts right in your own kitchen, no matter your skill level.
Immediate eBook download. No physical book available.
Includes ad-free recipes like:
∙ Lemon Pound Cake
∙ Starbucks Cake Pops
∙ Boston Cream Pie
∙ Chocolate Mousse
∙ Matcha Tiramisu
...and much more!
About the Author

Hey there! I’m Mandy
Mandy Applegate is a home cook, food blogger, and writer who believes the best meals are the ones shared with the people you love.
She’s all about easy recipes that taste amazing, the kind that make ordinary days feel a little more special and remind you why cooking at home matters.
She has been published on NBC, the Daily News, the Boston Herald, and the Chicago Sun-Times, amongst many others.