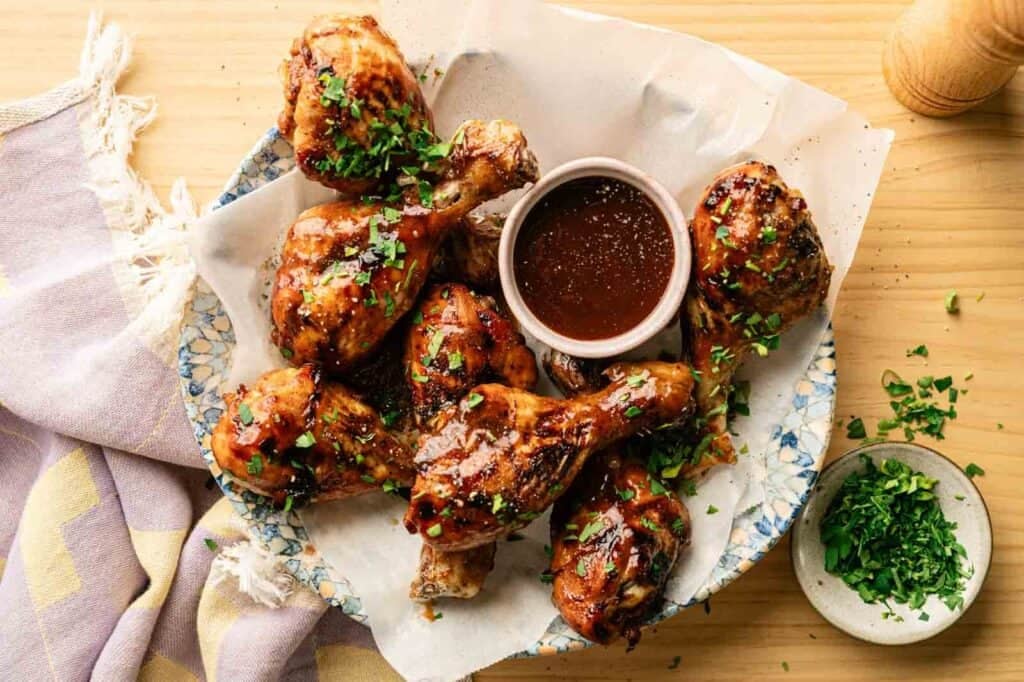
BBQ Drumsticks

BBQ Drumsticks are my answer to any night when I want something that feels like a real cookout without ever leaving the kitchen. They bake up juicy and tender with a thick, sticky BBQ glaze that coats every inch and caramelizes into something deeply rich and slightly charred around the edges. Messy in the best possible way and completely irresistible.
This post contains affiliate links. As an Amazon Affiliate, if you purchase through those links, I earn a commission. Thank you!
I make these for backyard cookouts, game day spreads, and family dinners when I want something that feels like a real BBQ without the grill setup. They hold up well at room temp so they’re perfect for picnics and outdoor gatherings too. Leftovers stay great in the fridge for 3 to 4 days or in the freezer for up to 3 months.
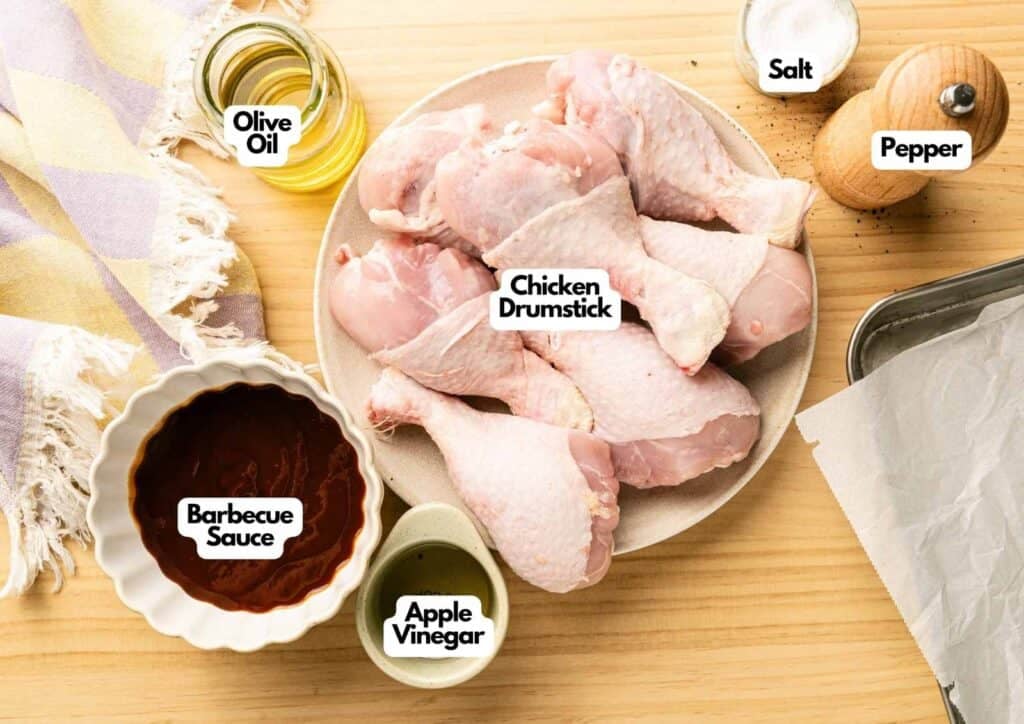
Ingredients You’ll Need
You’ll need all the ingredients shown in the photograph below.
How to Make BBQ Drumsticks with Step-By-Step Instructions
Scroll down for the full recipe card containing a full printable recipe and measurements in both US customary and metric units.
Here’s exactly how I bake this easy BBQ chicken recipe at home. It’s the perfect swap when you’re craving grilled BBQ chicken drumsticks but don’t want to fire up the grill.
Preheat the Oven and Prep the Tray
Preheat your oven to 400°F (200°C). I double-check the temp with my oven thermometer because it gives me peace of mind that the drumsticks will cook evenly from the start.
Line a baking tray with parchment paper or aluminum foil, whichever you have on hand, so cleanup is quick and the drumsticks don’t stick. I always grab a rimmed baking sheet for this because it heats evenly and never warps.
If you want extra-crispy skin all around, set a wire rack inside the prepared baking sheet so air can circulate underneath.
Dry Rub and Season the Drumsticks
Pat the drumsticks dry with paper towels so the seasoning sticks and the skin crisps. I love using reusable Swedish dishcloths for this since they’re absorbent, washable, and cut down on paper waste in the kitchen.
Toss them with olive oil (or avocado oil), salt, and black pepper until evenly coated. For a bolder seasoning mix, add a teaspoon each of garlic powder, onion powder, smoked paprika, and chili powder, plus a pinch of cayenne pepper or red pepper flakes if you like a little heat.
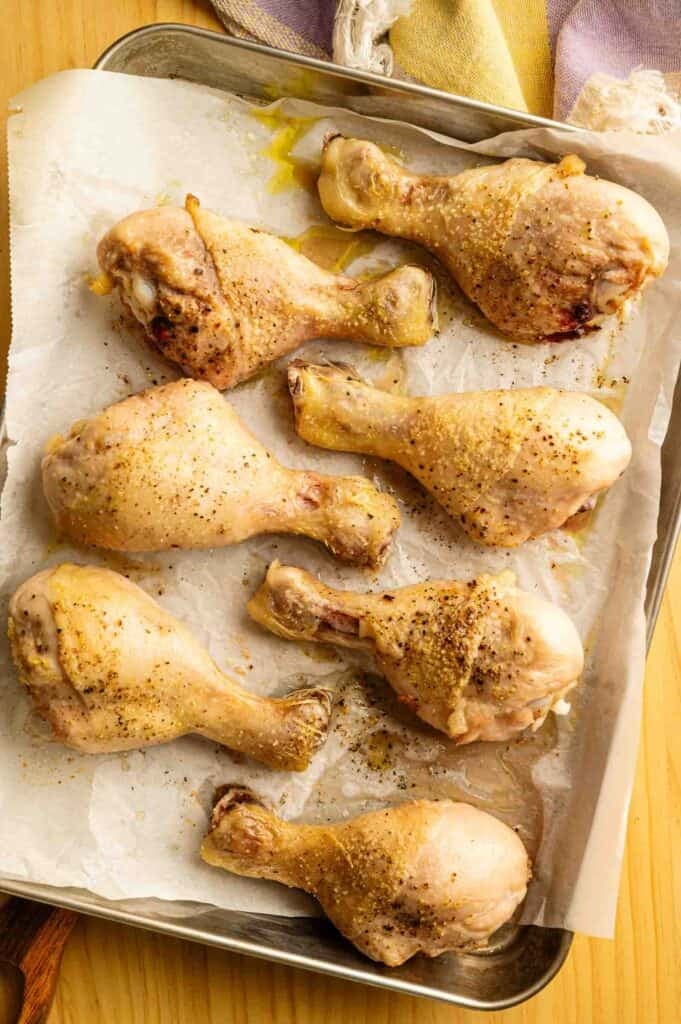
First Bake
Place the chicken drumsticks on the prepared tray in a single layer, leaving a little space between each one. Slide all the drumsticks into the preheated oven and bake for 25 to 30 minutes, turning halfway through so both sides get a head start on browning.
A good pair of silicone-tipped tongs makes flipping them easy without tearing the skin.
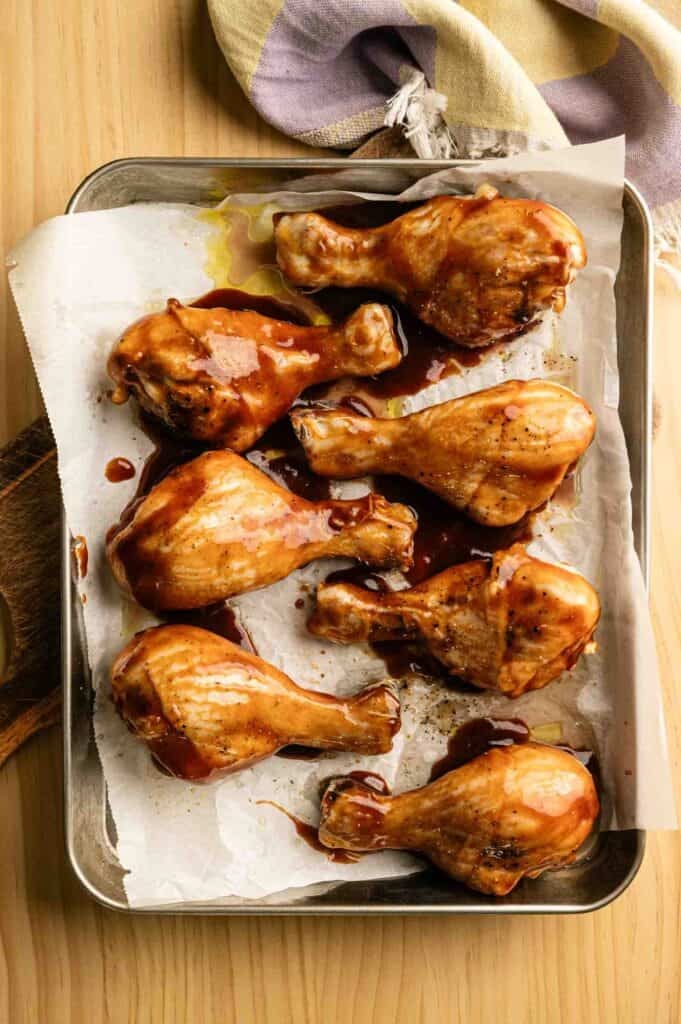
Mix and Brush the Sauce
In a small bowl, mix your favorite BBQ sauce and apple cider vinegar until smooth and glossy. Brush the sauce onto the drumsticks, coating all the crevices for maximum flavor.
Second Bake and Broil
Return the drumsticks to the oven and bake for another 15 to 20 minutes, turning and brushing with more sauce halfway through, until fully cooked and the chicken skin is glossy and caramelized (internal temperature should reach 165°F / 74°C). I keep a digital meat thermometer right next to the oven so I never have to guess if they’re done.
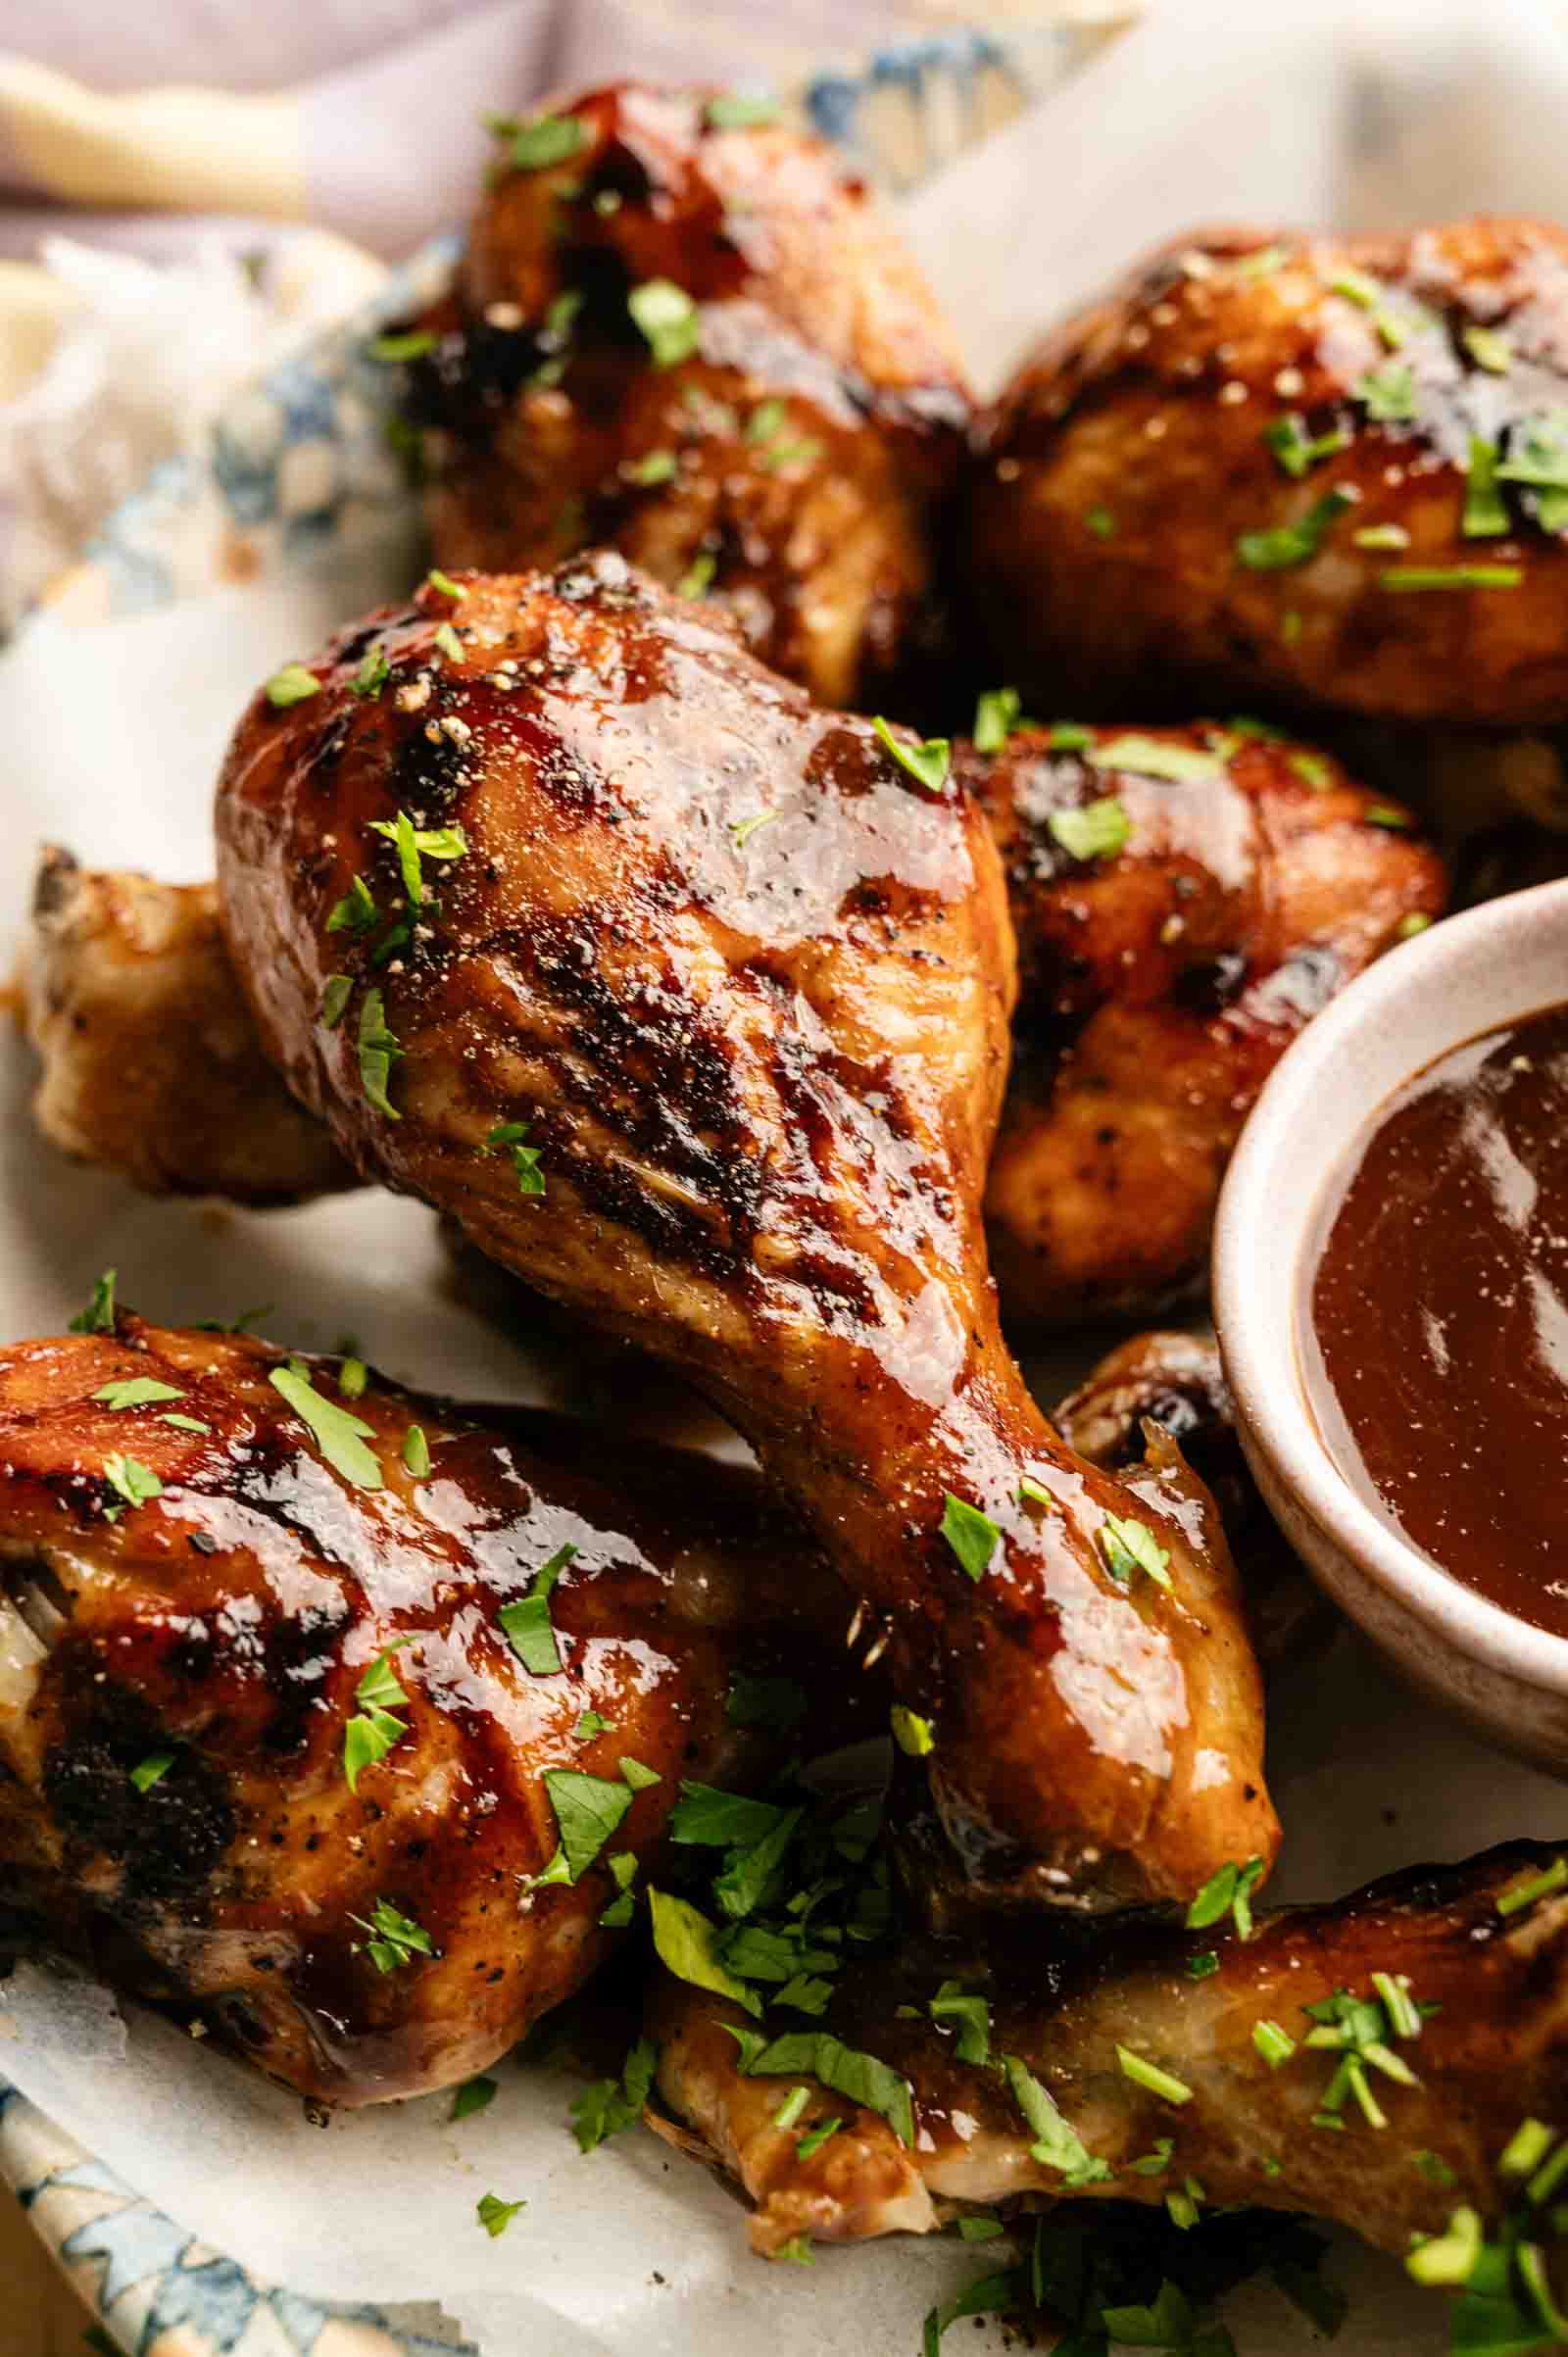
Cooking time may vary slightly depending on the size of your drumsticks. For extra crispy skin, broil for 2 to 3 minutes at the end.
Serve and Enjoy
Garnish with fresh parsley and serve immediately while the glaze is still warm and sticky. It’s a true crowd pleaser, the whole family will love. Enjoy!
If you’re taking the drumsticks on the go, let them cool for about 10 minutes, then pack them into an insulated food carrier or a foil-lined container with a kitchen towel on top to trap the heat for up to 2 hours.
Ingredients
- 10–12 chicken drumsticks
- Salt and black pepper to taste
- 2 tablespoons olive oil
- 1 cup barbecue sauce
- 2 tablespoons apple cider vinegar
- Fresh parsley for garnish
Instructions
- Preheat your oven to 400°F (200°C). Line a baking tray with parchment paper.
- Pat the drumsticks dry with paper towels. Toss with olive oil, salt, and pepper until evenly coated.10–12 chicken drumsticks, Salt and black pepper, 2 tablespoons olive oil
- Arrange the drumsticks on the prepared tray in a single layer. Bake for 25–30 minutes, turning halfway through.
- In a small bowl, mix the barbecue sauce and apple cider vinegar. Brush the sauce over the drumsticks.1 cup barbecue sauce, 2 tablespoons apple cider vinegar
- Return to the oven and bake for another 15–20 minutes, turning and brushing with more sauce halfway through, until fully cooked (internal temperature should reach 165°F / 74°C). For a sticky, caramelized glaze, broil for 2–3 minutes at the end.
- Garnish with fresh parsley and serve warm.Fresh parsley
Notes
- Pat them dry first: Drying the drumsticks with paper towels before seasoning helps the skin crisp up and lets the salt and pepper actually stick instead of sliding off.
- Space them out on the tray: Give each drumstick a little breathing room on the baking sheet so the heat circulates and the skin browns rather than steams.
- Sauce in two stages: Brushing the sauce on partway through, then again before broiling, builds layers of glaze without burning the sugars in the barbecue sauce too early.
- Broil with your eye on it: That final 2 to 3 minutes under the broiler is where the magic happens, but the sauce can go from caramelized to charred in a flash, so don’t walk away.
- Check the temperature: A meat thermometer takes the guesswork out of doneness. 165°F at the thickest part means juicy meat without dry, overcooked spots.
- Flash-freeze for easy storage: Freeze the cooled drumsticks on a baking sheet for an hour before bagging them so they don’t stick together, and you can grab just a few at a time.
Nutrition
How to Store Leftovers
Let the drumsticks cool completely before storing so condensation doesn’t make the skin soggy. Place them in an airtight container, layering with parchment paper between pieces to prevent the glaze from sticking together.
Refrigerate for 3 to 4 days or freeze for up to 3 months in these freezer-safe glass containers that stack neatly and keep the glaze from getting freezer burn. To reheat from the fridge, pop the drumsticks in a 350°F oven for 10 to 12 minutes until warmed through. The glaze will crisp back up beautifully.
From frozen, thaw overnight in the fridge first, then reheat the same way. Avoid the microwave if you can since it makes the skin rubbery instead of glossy.
What to Serve With BBQ Drumsticks
I love pairing the drumsticks with classic cookout sides like creamy coleslaw, buttery cornbread, baked beans, or a big scoop of potato salad. Grilled corn on the cob or a crisp green salad with ranch also works perfectly when you want something a little lighter on the plate.
For a heartier spread, serve them alongside mac and cheese, garlic mashed potatoes, or roasted sweet potato wedges. A pitcher of sweet tea or cold lemonade is the perfect finish, especially if you’re eating outside on a warm afternoon.
More Easy Recipes for You to Try at Home
If you loved these drumsticks, these easy chicken recipes are next on your list.
- Sticky Chicken Thighs
- Korean Fried Chicken
- White Chicken Enchiladas
- Buffalo Chicken Sliders
- Marry Me Chicken Meatballs
About the Author

Hey there! I’m Mandy
Mandy Applegate is a home cook, food blogger, and writer who believes the best meals are the ones shared with the people you love.
She’s all about easy recipes that taste amazing, the kind that make ordinary days feel a little more special and remind you why cooking at home matters.
She has been published on NBC, the Daily News, the Boston Herald, and the Chicago Sun-Times, amongst many others.